Upload one to ten photographs of the same object, add optional guidance, declare the real size in metres, and orbit the reconstructed GLB before you download it.
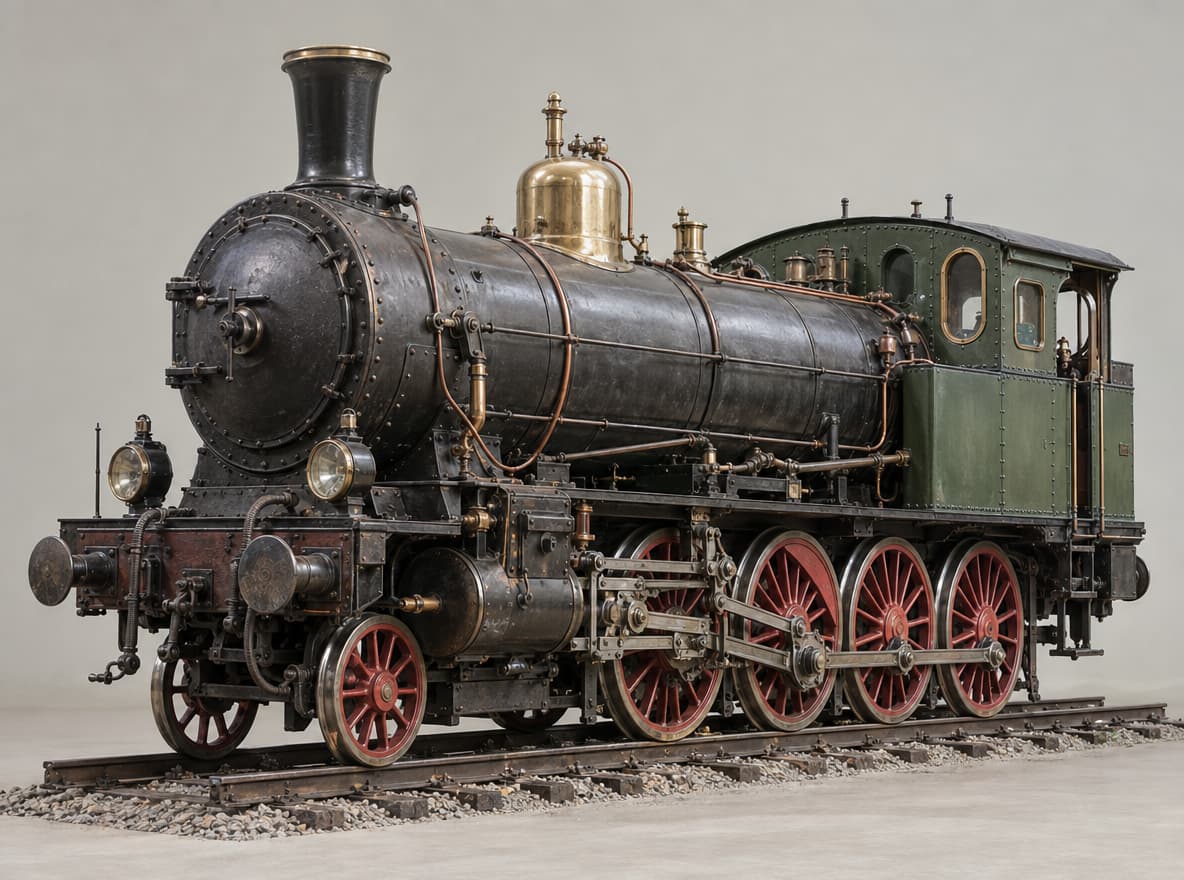
Image to 3D on Voor AI takes one or more photographs of a real object and returns a textured mesh you can orbit, inspect and download. GPT-6 Astra is the model behind this route: the photographs anchor the silhouette, the optional prompt names what has to be preserved, and the subject size field is what turns a picture into a mesh with a real-world scale. The pair below is the published example for this model, reference photo on the left and the downloadable GLB on the right.
Reference photo · the only input1 upload · 10 m subject
Preparing 3D viewer
Official example · image to 3D111 meshes · 6.5 MB GLB · drag to orbit
1reference photo used for the published example
10references accepted in a single run
6.5 MBGLB returned, textures included
2,787credits per run, however many views
Published example · guidance field, verbatimReconstruct the complete steam locomotive shown in the reference image as a detailed three-dimensional asset, including a short section of railway track. Preserve the overall proportions, cylindrical boiler and circular smokebox, tall chimney, brass domes and valves, green enclosed cab, visible wheel arrangement, red spoked driving wheels, connecting rods, front cylinders, buffers and fine external piping. Match the weathered dark steel, aged brass, copper, green paint and red wheel finish. Build coherent unseen sides with corresponding mechanical parts and closed surfaces. Keep the wheels on the rails and the rods connected to the wheels. Include cab window openings and glazing, riveted seams, handrails and step plates. Use a neutral presentation with no surrounding buildings, people, smoke, text, logos or branding.
View coverage
What one photograph can and cannot pin down
An image to 3D run only measures the surfaces it can see; everything else is completed so the mesh is closed. That is why the same object photographed from four angles comes back sharper than the same object photographed once — and why the second and third uploads in a run are usually worth more than a higher-resolution first one. The table below is what the published example could see and what it had to finish on its own.
From your photo
Front three-quarter
The uploaded frame pins boiler diameter, chimney height, buffer spacing and the offset of the driving wheels.
From your photo
Camera side
Wheel count, connecting rods, cab windows and the running plate all come straight off the visible flank.
Mirrored and completed
Opposite flank
Rebuilt as the counterpart of the visible side, with the same wheel arrangement and pipe routing.
Inferred from the type
Roof and underside
Completed from what the object is: cab roof curvature, smokebox top, and track beneath the wheels.
Reconstruction report
Kept, rebuilt, or guessed
Reading the output honestly is the fastest way to know whether one more reference would help. The three labels below describe the published example, and the same split applies to any object you upload: anything facing the camera is measured, anything hidden is completed, and anything that depends on the object's identity rather than its shape is guessed.
FeatureResultWhat that means
Overall proportionskeptBoiler length, cab height and wheel spacing follow the photograph closely.
Colour placementkeptGreen cab, brass domes, red spoked wheels and weathered steel all carry across.
Mechanical layoutkeptCylinders, buffer beams, handrails and piping stay where the photo puts them.
The far siderebuiltPlausible and symmetric; it is a reconstruction, not a measurement.
Cab interiorrebuiltOpenings and glazing are present, but nothing inside is a copy of the real cab.
Lettering and platesguessedPainted numbering arrives as surface detail, never as readable characters.
Before you upload
Six rules for image to 3D references
Bad references cannot be repaired by a better prompt. Every item below changes the geometry that comes back, and none of them cost a generation to fix — they cost one more minute with the camera.
01
Fill the frame, leave an edge
The subject should occupy most of the frame with a small margin around it. Cropping into the object removes the silhouette the mesh is built from, and a distant object gives the reconstruction too little to work with.
02
One object per run
Image to 3D expects every reference to describe the same subject. Two objects in a frame, or a second object entering a later view, splits the reconstruction between them.
03
Shoot diffuse, not dramatic
Open shade or an overcast day beats direct sun. A hard shadow across the subject reads as a surface feature and can be baked into the texture as a dark band.
04
Keep the camera at mid height
Photograph from roughly the subject's own centre line. Steep top-down or ground-level angles foreshorten the object and the reconstruction will inherit that distortion.
05
Add views, not zooms
A second angle is worth more than a sharper version of the first. Front, three-quarter, side and rear in the same run close the gaps that a single photo leaves to inference.
06
State the real size
A photograph carries no scale information, so set the subject size before generating. The number you choose is the only thing that makes a downloaded GLB dimensionally useful.
What you download
A photographic rebuild arrives as one GLB
Every image to 3D run returns a single binary glTF file: geometry, UV maps, baked textures and material assignments in one container. The figures below come from the published example file on this page rather than from a specification, so they describe what a real photographic reconstruction weighs.
6.5 MBSingle .glb, textures included
111Named meshes
526Scene nodes
30Baked texture images
11Materials
Y-upglTF 2.0 orientation
A photographic rebuild usually lands heavier than a text to 3D scene because the surface detail is measured rather than invented: 111 meshes and 30 texture images in this example against 92 and 27 for the hangar on the text to 3D page. Both files open in the same viewers and both can be decimated in Blender if the build needs a smaller asset.
Image to 3D or text to 3D?
Stay with image to 3D when…
The object exists and its proportions have to survive.
You have photographs of the same subject from two or more angles.
Colour placement on the real object carries meaning.
You are rebuilding a vehicle, prop, product or device.
The generator on this page is already set to GPT-6 Astra image to 3D, and the model picker beside it can switch to the other image-driven 3D reconstructions on Voor AI.
The object does not exist yet and you are exploring a shape.
No usable reference photograph exists.
You want a staged scene around the subject, not a lone prop.
You would rather iterate by rewriting a sentence.
Text to 3D asks for a written brief and a declared subject size instead of a photo, and returns the same GLB format.
A useful third option sits between the two: generate the reference still with text to image, check the framing, then feed that file into image to 3D here. Everything you build sits on the 3D models page alongside the image-only reconstructions, so comparing a photographic rebuild with an image to mesh conversion takes one more run rather than a different tool.
Image to 3D FAQ
What is image to 3D?
Image to 3D rebuilds photographs of a real object as a textured three-dimensional model. Upload one to ten references of the same subject, add optional guidance, declare how large the subject really is, and the result is a mesh file you can orbit in the preview and download. GPT-6 Astra is the image to 3D model behind this route, and it returns GLB.
How much does image to 3D cost on Voor AI?
One image to 3D generation costs 2,787 credits, whether you upload a single photo or ten. GPT-6 Astra is priced per run rather than per image or per polygon count, so adding views to close a gap in the silhouette does not raise the price. The generator shows the same estimate before anything is charged.
How many photos should I upload to image to 3D?
One photo is enough to start and is exactly what the published example on this page used, but every view you do not supply has to be inferred. Two to four references — front, three-quarter, side, rear — are the practical sweet spot for props and vehicles, because the model can then cross-check the silhouette instead of inventing it. The field accepts up to ten.
What makes a good image to 3D reference photo?
Even, diffuse light with no hard shadow falling across the subject; the whole object in frame with a little space around it; the same object in every shot; and a clean background where possible. Sharp focus matters more than resolution: a crisp 1,200-pixel photo reconstructs better than a soft 4,000-pixel one, because edge position is what drives the geometry.
What file does image to 3D return?
A single binary glTF file with the extension .glb. Geometry, UV maps, baked textures and material assignments travel together in one container, so Blender, Unity, Unreal, Godot, three.js and model-viewer all open it directly. The published example on this page is 6.5 MB across 111 meshes, 526 scene nodes and 30 textures.
What does the prompt field change in image to 3D?
It is optional guidance, not a second brief. Use it to name what must be preserved — proportions, colour placement, wheel arrangement, surface wear — and what must not appear in the output, such as a background, people, lettering or branding. Without a prompt the model reconstructs the subject and decides the unseen sides on its own.
What does the subject size field do in image to 3D?
Subject size sets the longest dimension of the finished subject in metres, from 0.05 to 20. A photograph carries no scale of its own, so this value is what makes the mesh dimensionally meaningful: the same photo at 0.3 metres describes a model kit, and at 4 metres it describes a full-size vehicle. It does not change how much surface detail is reconstructed.
Why does image to 3D invent the back of my object?
Because the geometry has to be closed. A single photograph only constrains the surfaces facing the camera, so everything behind them is completed from the object's type — a locomotive gets matching wheel sets and pipe runs, a bottle gets a symmetrical body. Add a rear or side view to the same run when the hidden side matters, and the reconstruction is constrained instead of guessed.
Should I use image to 3D or text to 3D?
Use image to 3D whenever the object already exists and its proportions, colour placement or mechanical layout have to survive; the photographs anchor the silhouette in a way no sentence can. Use text to 3D when the object is still a concept, when you have no usable reference, or when you want a staged scene around the subject rather than one prop. Both routes return the same GLB format and share the 3D picker.
Upload the references, then orbit the rebuild
One photo is enough to start; two to four close the gaps. Set the real subject size, name what must survive, and let GPT-6 Astra return a GLB you can inspect before you download it.