Repair fading, noise, and surface damage on a scan you own — then check the result against what the original actually showed.
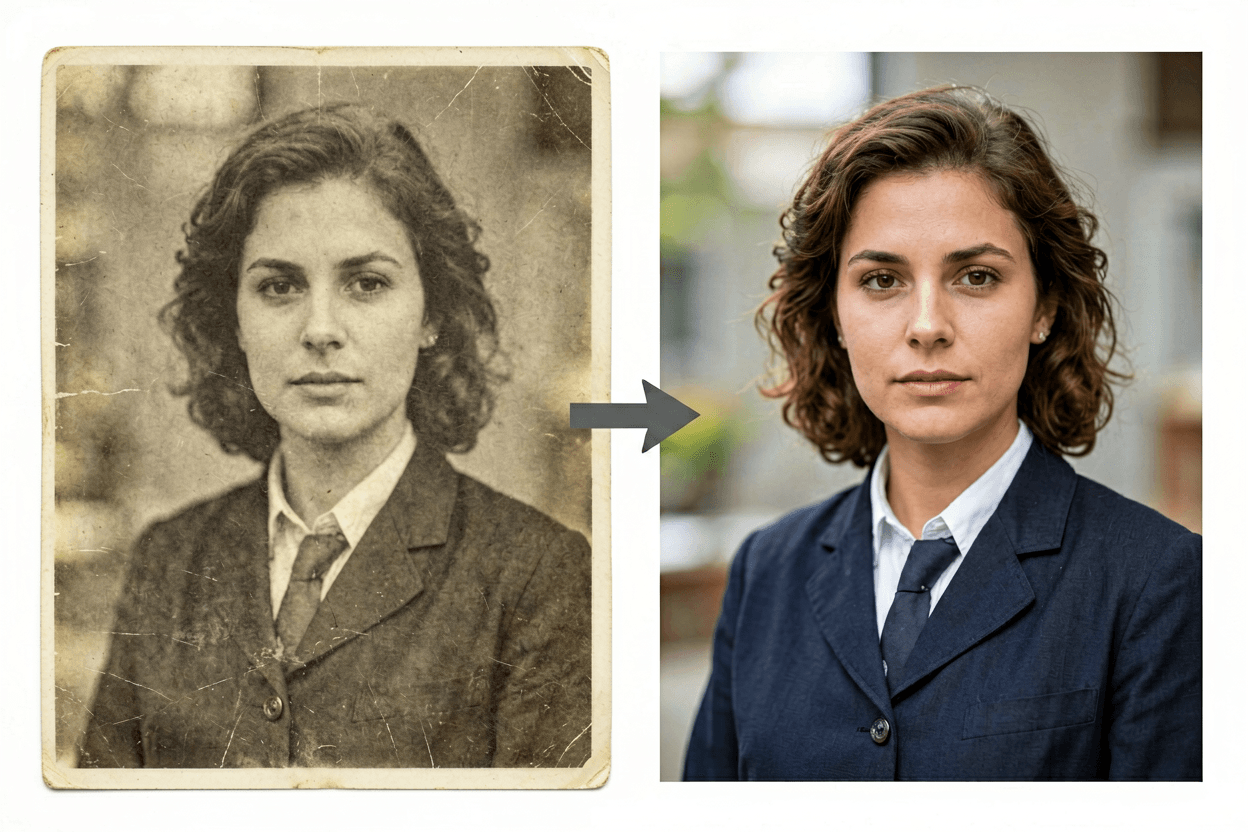
Generator examples

What AI image restoration can and cannot give back
A damaged photograph has two kinds of problem. Some detail is still present but obscured — buried under a colour cast, grain, low contrast, or light surface scuffing. Other detail is simply gone, torn away or dissolved. AI image restoration is very good at the first kind and fundamentally unable to solve the second. It fills missing regions with something plausible, and plausible is not the same as true.
Keeping that line clear changes how you use the result. For a faded family portrait where the faces are intact, AI image restoration recovers something close to what the negative held, and you can trust it. For a photograph with a tear through someone's cheek, the model will produce a clean, confident cheek that belongs to nobody. The output looks better and means less.
So the workflow below is built around one habit: restore, then compare against the original at full size before you accept anything. AI image restoration is a drafting tool for archives, not an authority on them.
What responds to AI image restoration, and what does not
Match the damage to the column before you decide how much to trust the output.
| Damage | Outcome | What to check |
|---|---|---|
| Even fading / colour cast | Reliable — the information survives, only the balance shifted | Skin tones and neutral greys against a known reference |
| Film grain and sensor noise | Reliable, though fine texture is smoothed with it | Fabric weave and hair, which lose detail first |
| Light scratches on flat areas | Usually clean | Edges near the scratch for smearing |
| Moderate blur | Partial — recovers edges, invents micro-detail | Eyes and printed text, where invention shows |
| Tear across a face | Unreliable — the region is reconstructed, not recovered | Whether the person is still recognisable to someone who knew them |
| Missing corner or large hole | Invented entirely | Treat as illustration; keep the gap in the archival copy |
| Broken-up text or handwriting | Frequently wrong and confidently so | Every character, against the original |
The order that produces the fewest surprises
Sequence matters more than settings. Doing these steps out of order is the usual reason a restoration looks synthetic.
01
1. Capture properly
Flatbed scan at 600dpi or more, print squared to the glass, lid closed. If you must photograph, use diffuse daylight, shoot straight on, and avoid glare — AI image restoration cannot remove a reflection it thinks is part of the picture.
02
2. Restore before you enlarge
Run AI image restoration on the native-resolution scan. Upscaling first magnifies every scratch and grain cluster, and the restoration pass then spends its budget on artefacts.
03
3. Compare at 100%
Put the original and the restored file side by side at full size. Look at eyes, teeth, jewellery, buttons, and any text. These are where invention appears first.
04
4. Upscale last, if at all
Only once you accept the restoration, take it to super resolution for print sizes. Export both files and keep the untouched scan.
Where AI image restoration earns its place
Family archives
Faded prints from the 60s-90s, where the damage is even and the faces are intact. The best case for AI image restoration by a wide margin.
Scanned slides and negatives
Colour shift and dust are exactly what the model handles well. Scan at high resolution and let the restoration deal with the cast.
Product and catalogue scans
Old print material brought back for reuse. Check logos and type carefully — those are the parts that get quietly rewritten.
Reference for retouchers
Use AI image restoration to produce a fast draft, then hand-correct the regions you know it guessed.
Web-size reproduction
For screen use the reconstructed micro-detail rarely matters. This is the lowest-risk output size.
Print enlargement
The highest-risk case. Every invented texture becomes visible, so review at print scale before committing.
Habits that keep a restoration honest
Do
- Keep the original scan forever, and store the restored file beside it.
- Label restored images as restored when they are shared or published.
- Restore first, upscale second — never the other way round.
- Show restored faces to someone who knew the person before you circulate them.
- Work from the highest-resolution capture you can make.
Don't
- Do not overwrite the original with the AI image restoration output.
- Do not trust reconstructed text, dates, or handwriting without checking.
- Do not colourize and then present the colours as historical fact.
- Do not run restoration on a screenshot of a photo when the print is available.
- Do not accept a result that looks better but no longer looks like the person.
01Scan at 600dpi or higher — AI image restoration cannot use detail your scanner never recorded.
02Crop to the print edge first; borders and album paper distract the model.
03If faces drift, restore a tight crop of the face separately and composite it back.
04Compare at 100% zoom, not fit-to-screen; artefacts hide at small sizes.
05Export a web copy and a print copy separately — they need different amounts of restoration.
AI image restoration FAQ
Does AI image restoration recover detail that was never captured?
No. It reconstructs a plausible version of what is missing. AI image restoration is an informed guess constrained by the surviving pixels — sharp where the negative held detail, invented where it did not. Treat a restored face as a likeness, not as evidence.
What damage does it handle well?
Even fading, colour casts, light surface noise, film grain, moderate blur, and scattered scratches on flat areas. AI image restoration is strongest when the damage is spread thinly and the structure underneath is intact.
What does it handle badly?
Large tears through a face, missing corners, heavy mould, and text that has broken up. AI image restoration will fill those confidently and wrongly — it has no way to know what the missing region contained, so it invents something that merely fits.
Should I scan or photograph the original?
Scan if you can, at 600dpi or higher, flat and square. AI image restoration inherits every problem in the capture: a phone photo of a print under a ceiling light adds glare, keystone distortion, and its own noise before the model sees anything.
Will faces still look like the same people?
Usually, if the face occupies enough pixels and is not badly damaged. Small or damaged faces are where AI image restoration drifts most, because it falls back on general knowledge of what a face looks like. Always show the result to someone who knew the person.
Can I colourize a black and white photo?
You can add colour, but understand what that means: the hues are plausible, not recorded. AI image restoration has no record of the actual dress colour or wall paint. Keep the monochrome version as the archival copy.
What resolution should I export?
Restore first, then upscale if you need print size. Running super resolution before AI image restoration amplifies the damage along with everything else, and the restoration pass then has to fight artefacts it did not create.
Is the restored file suitable for archives?
Store it alongside the original scan, never instead of it. An archive needs the untouched capture; AI image restoration output belongs next to it as a derived, clearly labelled version.
People also search for
- ai image restoration old photos
- ai image restoration free online
- ai image restoration scratches
- ai image restoration faded colors
- ai image restoration for print
- ai image restoration black and white
- ai image restoration damaged photo
- ai image restoration high resolution
AI image restoration is the repair step. Enlargement belongs to super resolution afterwards, and background cleanup belongs to a dedicated matting tool rather than to the restoration pass.
Restore a scan you own
Capture it properly, restore before enlarging, then compare against the original at full size.
Open the generatorAI image restoration for damaged or noisy archives
Reduce noise, scratches, and compression artifacts on scans and old phone photos so archives become usable in modern layouts without hours of manual cleanup.
Preparing sources
Work from the highest-bit-depth scan you have. Cropping before restoration avoids wasting model capacity on irrelevant border damage.
FAQ
- Will faces look plastic?
- Dial back strength if skin becomes waxy; some models offer presets tuned for portraits versus documents.